Monday, March 26, 2012

Hats off to you.

ETA: The acknowledgement below still stands, but multiplied by about ten. The code isn't just a code. It's a rabbit hole. I'm stuck at the moment. 

Confidential to Mr. Harkaway or Mr. Booher:


Thanks for this, and the rest of the book. Great fun. :)

Angelmaker by Nick Harkaway - Review

ETA: Cracked the code! I'll write another post with hints tomorrow. Confidential to Mr. Harkaway: a patch of ice, eh? A likely story.

Nick Harkaway is back with another satisfyingly-unclassifiable, broadly-scoped-but-detail-conscious, avert-the-apocalypse novel to follow his first, The Gone-Away World. That's not to say that one follows the other - they're independent stories - but there is a curious reappearance of maroon Rolls-Royces and a peculiar focus on bees (which had a passing role in The Gone-Away World but feature much more prominently here). I tried hard to read this book without thinking of The Gone-Away World, because the two have nothing to do with each other, but it was difficult. I will admit freely that The Gone-Away World was and is one of my top two favorite books, so any sophomore novel of Harkaway's has to fill big shoes from my perspective. I'm going to try to review Angelmaker on its own, but I'll put some comparisons in at the end, because I think it makes for interesting speculation.

Once again, I can't really tell you what this book is about. Most prominently, there's Joe Spork, son of a flashy gangster of ill repute, who emphatically does not want to follow in his father's shoes, even while inheriting his socks. There's the indefatigable Polly Cradle and her unique fascination with the timing of certain British train lines. There's a horrendously ugly dog who gets carted about (most of the time) by the unlikeliest, most interesting female protagonist of the past (and next?) ten years, Edie Banister. There's a train called the Ada Lovelace (!) and a baby war elephant with rather opportune timing. Most importantly, there's a plot to destroy the world, leveraged by a caricature of a villain (who is nonetheless absolutely deadly and as timeless as Enoch Root) and enabled by Joe Spork's brilliant and achingly sympathetic erstwhile grandmother. And of course, the bees. (It's here that I want to interject, "But wait! I haven't even mentioned the Book, or the veiled monk-like techno-cultists, or the kelp-armored submarine!" Suffice it to say that this book is difficult to sum up, and that it will all come out in the wash.)

It took me 104 pages to stop worrying that Harkaway had grown up so much that he had written exactly the type of book that made me hate High Fidelity so much: the kind with a single, male protagonist in his one-third life crisis  who aspires to abide by the law, and complains because he doesn't lead an exciting life of crime and gangsters. See quote:
"This day is the pattern of his life. He is the man who arrives too late. Too late for clockwork in its prime, too late to be a gentleman crook, too late to know his grandmother. Too late to be admitted to the secret places, too late really to enjoy his mother's affection before it slid away into a God-ridden gloom. And too late for whatever revelation was waiting here. He had allowed himself to believe that there might, at last, be a wonder in the world which was intended just for him. Foolishness." p. 85
It takes a train (several trains - chemical transport ones) and an attractive set of toes to do it, but Joe Spork stops resembling Rob Gordon at some point (thank god). The change (not the one at the end - I won't say anything more about that one) is distinct enough that I wonder if mealy-mouthed Joe Spork of pages 1-103 is a purposeful ruse that Harkaway put out to throw people like me off their guard. I'm dubious about that notion, though. It feels more like he's trying to write a different type of book, and slips sort of inevitably into his natural style somewhere along the way. Again, thank god.

So Joe Spork is dragged, increasingly-less-reluctantly into a world that seems to be going to hell in a bad way, and somehow he's the one to spearhead the operation to save it. We bounce back and forth for a while between Joe's modern-day escapades and Edie Banister's prior ones. I will say that this book cannot possibly have enough of Edie Banister. She's just the right balance of feisty and no-nonsense and relatably human. The most achingly poignant scenes in the book happen when she, right along with us, tries to figure out the enigmatic and impossibly brilliant Frankie, and coming up short. I haven't read the Edie Banister short story, but it's on my to-do list this weekend. I tend to find myself utterly devoted to Harkaway's characters. They're at once larger-than-life and utterly human, and they stand no chance ofbeing lumped in with the traditional modern-fiction stereotypes.

The tone throughout is distinctly irreverent, cheeky, and with a sense of its own ridiculousness. See quote:
"...sometimes the plummy, playful verbiage is obnoxious. It conceals emotion. Actually, it mocks emotion, the better to pretend to be above it." p. 177
Ironic or self-mocking? Given Harkaway's approach to emotion and his way with words about it, I tend toward the latter. Actually, I think that's part of what I find so appealing about his novels. He finds words for catastrophic moments and deep emotion, and suddenly the insane world of Angelmaker is a little more believable, because right here is something we can relate to. See quote:
"[something has happened] most awfully, most deliberately, most pointedly, and that is the world now, newborn and hard." p. 105
There's something about this that is quintessentially Harkaway. His characters run up against reality, and they are unlike heroes in that they don't have any special defenses for when the world knocks them silly, and we know how they feel because we are also unlike heroes in that way.

The threads of this story are delightfully steampunk-ish, with absolutely no mention of zombies (well, ok, just once, and it's part of a solid plotline, and unique enough that it might just be a wink-and-a-nod in the direction of that tired genre). They're also incredibly vivid (in line with China Mieville, although not nearly to that extent. Despite the imagery,I found myself wishing for a few ink drawings along the way (for the Book and the whojimmy, in particular).

But! I can't possibly complain, because while there are no drawings, there is a code hidden on the (American) dust jacket! I haven't worked it out yet, but the fine folks at Knopf have left a few clues. I suppose I can give up illustrations in favor of a clockwork code on a book about a clockwork book.

Ok, *now* we compare with The Gone-Away World?
Full disclosure, as above: The Gone-Away World pretty much tops my list of favorite books (although it is sometimes beaten out by Name of the Wind), which definitely colors my opinion. That said, I do still think that Angelmaker is a good book with solid storytelling and an enjoyable sense of fun. It's a much more character-driven book than TGAW in that this is more of a book about what people figuring out their relationships to each other while the world goes to pieces (and trying to save it), rather a book about the world going to pieces and people trying to save it (and figuring out their relationships to each other in the process). Whether you happen to like the former approach over the latter or vice versa is just personal preference.

Angelmaker is perhaps a more mature book than TGAW. We see more character development, more self-doubt, less recklessness (though there is still a significant amount of it!). It makes me slightly sad, because we have grown up from the Gone Away World. The issues in this world are the same as in the last one - Bad People who do Bad Stuff to destroy Everything - but as "responsible grown-ups on the wrong side of thirty-five" (p.86), we cannot give them the faces of monsters and call on the School of the Voiceless Dragon to ferret them out and do away with them. This is the world now, newborn and hard.

Enough mawkishness - this is still undoubtedly a book worth your time. It's unlike any other book on the market – wildly imaginative, in equal parts violent and humorous, and I think the author knows it:
"Who creates a superweapon or a superwhatever-it-is and makes it so bloody whimsical?" (p. 203).
Thank you, Nick Harkaway, for making the world so bloody whimsical.


Good quotes:
"Mr.Pritchard! What are you doing? is that O-soto-gari? No! It is not! It is a yak mating with a tractor! That is *really* very very not very good!" p. 127
"The man is a brigand in the pay of the Opium Khan; it's not every day he is assailed a willowy white lunatic in forest green, borne along on a wave of fire by a box on wheels. Indeed, there probably aren't many people who have great familiarity with this situation." pp. 245-246.
Ha! Amazon's statistically improbable phrase capturer must have a field day with Harkaway's books.

"From within comes a noise like a trombonist being goosed during the overture." p. 261

TL;DR: Good book. Inventive and fun. Maybe not as good as his first, but cleverly written.

Sunday, March 11, 2012

Argyle Ladybug Photoshop Tutorial

I was looking at a picture of a ladybug the other day, and I started thinking man, this little guy is just not very stylish. Ladybugs need a bit more variation in their wardrobes. And so I offer you the opportunity to dress your very own ladybug in some sartorially-conscious argyle:


Ok, so not really. I just like argyle, and I like ladybugs. I'll take you step-by-step through the process that I used to create this guy.

1. The first step is to collect the files that you'll be using. You can import them into Photoshop now, or just leave them in a handy place so that you can find them as the need arises. I used this ladybug from this website:

By LittleMissParasite
This leaf from here:


And the argyle pattern from this tutorial (you could make your own in Illustrator - it's an excellent tutorial - but I used the final product that he posts on his website): 

create-argyle-pattern-2

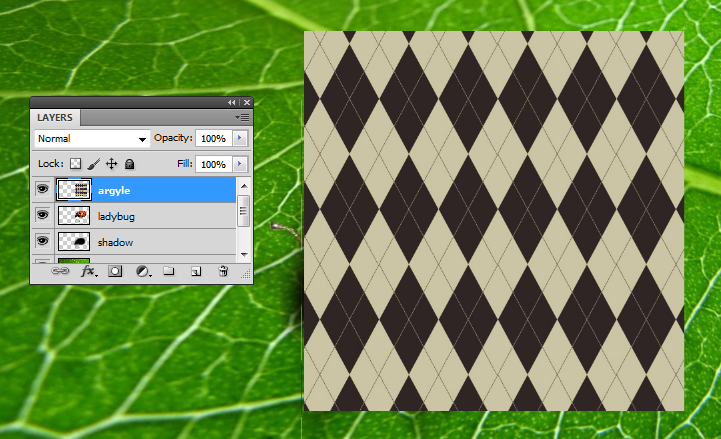
2. Once you've got your files assembled, open up Photoshop and create a new file. I'm using a canvas size of 1366x768 so that I can use it as a desktop background, but you can make yours any size you want (within reason - keep the resolution of the leaf and ladybug in mind). Import the ladybug file and give it its own layer. Title the layer something appropriate.


3. The next step is to extract the ladybug and leave the leaf behind. I suppose you could skip this step and just use the background as-is, but I found a leaf I liked more, and I didn't particularly like the border around the edges. For this particular extraction, I used the quick mask mode. You might be able to get away with using the magnetic lasso, but I didn't like the result. Your other option is the pen tool, but I think that the quick mask gives the best results - you just have to be a little bit patient. 

Enter the quick mask mode by pressing "q" on the keyboard or selecting the circle-inside-a-rectangle icon below the foreground/background selection swatches.


 Select a round brush with 100% hardness. Make sure that the flow and opacity are both set to 100%. 


3. Double clicking on the click mask icon will bring up this window: 


Use approximately these settings. The color is important - quick mask defaults to red, and a red mask on a red ladybug won't go very well. I also bumped the opacity up to 70%. I thought 50% was a little difficult to see. 

4. Start painting over the ladybug with a fairly big brush. I started with a very large brush - 300 px or so - to cover the majority of the ladybug's shell. 


5. Using progressively smaller brushes, start painting over the more detailed parts of the ladybug. A helpful keyboard shortcut here is using the "[" and "]" keys to change the size of the brush. Don't go too crazy - you can skip painting in the little hairs on the antennae, for example - but you do need to go pretty small to get the legs and stuff.


Zoom in for the finer details. The finer your work is here, the better the final product will look. Keep going until the entire ladybug is masked in blue.

This level of detail should be fine. For the last bit of masking, I switched back to a very large brush, and used the edge of that to approximate the curve of the ladybug's shell. That way, you get a smoother edge. (There's math there, I just don't know exactly what it is. Something calculus-y.)

6. Now press "q" again. The marching ants selection line should appear around everything that was not masked.


7. Now press "Delete". You should be left with just a ladybug on a white background. I resized and rotated it a bit using Transform (Ctrl+T), but you don't have to if you don't want to.


8. Now import your new leaf background on a different layer. Title it something impressively creative.


9. The next step is to put the leaf into perspective, so it looks like the ladybug is actually walking on the leaf and not floating in front of it. Press Ctrl+T to transform it, then hold down Ctrl to use the Distort mode as you move the handles as below. You may want to move the ladybug layer above the leaf layer for a reference.


11. Obviously we've got some work to do here - it looks awfully Photoshop-y at this point. The first step is to add the ladybug's shadow back in. Press Ctrl and click on the ladybug thumbnail in the layers palette to select just the ladybug. Copy and paste it into its own layer and call that layer "shadow." 

Now, with that shape still selected, fill it the selection with black.


12. Move the shadow layer under the ladybug layer. Get rid of the selection (Ctrl+D), but keep the shadow layer activated. Go to Filter>Blur>Gaussian Blur and set the blur to 13.0 px. 


13. Using the direct selection tool (the black arrow symbol), move the shadow so that it approximates the original shadow in the original photo. No need to get too precise - we're going to transform it in the next step to make it look a little more accurate.


14. It looks better with the shadow, but the legs still look like they're floating a bit, and the overall shape isn't quite right. While you're still on the shadow layer, press Ctrl+T to transform it, then right click on the canvas and select the Warp tool. 


15. Using the Warp tool, start nudging the shadow around. You want to make the shadow near the head a little bit wider. Also, make the shadow-feet meet up with the real feet in such a way that the feet touch, but the shadow of the leg is in front of the real leg.


16. Better, but still not perfect. Pick up the brush tool and select a round 0% hardness brush and set the opacity and flow as shown: 


Now, brush in some shadows near the feet. Use a small brush (like 12 px to start), and as you move away from the foot, use one a few pixels larger - maybe 20 px. Don't go crazy - subtlety can work in your favor here. Let the shadow fade away as you move away from the foot. 

Shadows can really make or break your image, so be careful in this step. Take the angle of the light into account, as well as the angle of the legs and the angle of the leaf. If you took a really long time to get this step right, it would be time well-spent.


17. Once you're happy with your shadow, it's time to move on to the interesting stuff. Import your argyle texture (or follow this excellent tutorial and make your own) and give it its own layer above the ladybug.


18. Press Ctrl+T to transform the image, and rotate it clockwise about 45 degrees. I also resized it to be slightly smaller. Make sure that if you do resize it, you hold down the shift key to maintain the proportions.

You'll also notice that I took the opacity of the argyle down to about 70% to make it easier to line up the pattern. Try to line it up so that the line down the center of the carapace lies directly between two of the black diamonds. It will also look better if that line is parallel to the line that runs through the longest dimension of the black diamonds at at least one point. See below:


19. Still in Transform mode, select the Warp tool again. Start nudging the argyle shape around the ladybug's shell. The important parts are the top and bottom edges. See if you can make the argyle pattern make the same curve as those upper and lower edges. Don't worry if the pattern hangs over in some places. We'll crop that out later.


20. Hold Ctrl and click on the argyle layer thumbnail to select its contents. Go to Filter>Distort>Spherize, and set the slider to about 45%. Press OK.


21. Depending on how happy you are with the argyle pattern at this point, you may or may not need to go to the next step. Go to Filter>Liquefy and choose the Bloat tool.


With a these settings, click once or twice in the center of the argyle pattern.


You may find it necessary to go back now and redo some of the warping you did earlier. You can modify it all you like, but make sure that the argyle always overlaps all of the red.


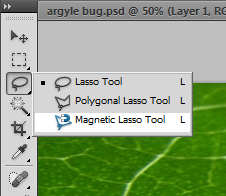
22. Now turn off the argyle layer for the moment. Click on the ladybug layer and select the magnetic lasso tool (click and hold on the lasso tool to find it).


Using the magnetic lasso, trace all the way around the red part of the ladybug. The tool does a nice job of selecting anchor points itself, but sometimes you may need to click and add one if the tool wanders off in an odd direction. Once you've made it all the way around, click on your very first anchor point to complete the loop and make the selection.


23. Go back and turn your argyle layer back to visible and make sure that layer is active. Press Ctrl+Shift+I to invert the selection, then press Delete.


24. Turn up the opacity of the argyle layer to 100% and select Overlay as the blend mode (Soft Light and Linear Light might also work, depending on your preference).


25. Make a new layer on top of the argyle layer and fill it with this gradient:


Copy all of it (Ctrl+C). Go to the Channels palette and paste it into a new channel (Ctrl+V). Call this channel "blur source".


You can delete the original gradient at this point - we don't need it anymore.

26. In this step, you're going to have to combine all your current layers into one. I like to make a copy of all of them, just in case I have to go back and change something. Lock the duplicates and make them invisible.


 Now select all of your other layers, right click, and select "Merge visible".


I forgot to take a screenshot of this, but using your rectangular marquee tool, select the entire canvas and copy it onto a new layer. You can get rid of the old merged layer. This will make it easier to apply an accurate Lens Blur in the next step. 

27. With your new merged layer, go to Filter>Blur>Lens Blur. You can play around with the settings to find a look that you like. I like these settings:


Make sure that the source is set as "blur source" (or whatever you titled your gradient in the channels palette). I have the shape set to octagonal, the radius to 19, the curvature at 8, and the rotation at 31.

28. Last step: vignetting. No doubt there are real graphic designers out there going "God no! Not another vignette!", but I like the way it looks. Go to Filter>Lens Correction and apply these settings:


That's it! I didn't quite like the way the argyle pattern lined up with the shell, so I went back and changed the way it was warped back before the Spherize and Bloat steps. Here's my final result:


Questions? Leave a comment!

If you use this tutorial and happen to post your result somewhere on the interwebs, leave a link...I'd love to see!


Saturday, March 3, 2012

Last Stop on the Going Train

The last time I wrote about the inner workings of a mechanical watch, I ended with the fourth wheel, which interacts with the final piece of the puzzle, the escapement/balance combination. The combination of gears that makes up the going train is all very well and good, but it's the escapement and the balance that make all those tiny mechanical parts into an actual timekeeping device.

An actual timekeeping device. Source:  "Nature" journal, September 22, 1887, pp. 485. For all the tiny parts and clever engineering, mechanical watches are awfully old. 
The escapement is what keeps all of the energy in the mainspring from dissipating all at once. Imagine a heavy weight raised up to the ceiling with a pulley. You're holding on to the other end of the rope. If you let go of the rope, all the energy you put into the weight to get it into the air is released all at once, and the weight puts a hole in your floor. Instead, you can choose to let it down slowly by applying some downward force to the rope. The energy released is the same, but it's over a longer period of time, and you don't do any structural damage to the building. Which method you choose depends on how much you like your floorboards or your neighbors.

The same thing happens with a mechanical watch or clock. The wound mainspring is like the weight/pulley system when the weight is all the way up at the ceiling. You, if you decide to pull back on the rope and slow the pulley's descent, are like the escapement: you control the release of potential energy in the system. If there were no escapement, all of the energy in the spring would be released in a very short amount of time. (Quick physics note: energy per unit time is defined as power, or P = W/t. The maximum energy in this system is constant [due to the physical limitations of the mainspring], so as time gets very small, power gets very big. Thus, a hole in your floor.)

Oops.

By regulating the power output at a very precise rate, the escapement turns all those gears into a useful way to keep track of time. The escape wheel is shaped differently than the rest of the gears. The teeth look a little bit like those things that keep you from driving back into parking garages once you've left.


Courtesy of Guardian Traffic Control Systems.


And with good reason - their purpose is really the same: to allow motion in one direction, but not the opposite. In a watch, the fourth wheel meshes with the escape wheel's pinion (gear with fewer teeth than the main gear that spins on the same axle and with the same angular frequency as the main gear). The pinion turns the axle, which turns the escape wheel. However, the bow-shaped bit on top of the escape wheel prevents it from spinning freely. The anchor (bow shaped bit) rocks back and forth to allow only one tooth at a time to escape.


Every time the anchor swings in one direction, it also gives a little push to what's called the balance wheel.

File:Alarm Clock Balance Wheel.jpg
Credit to Chris Burks for the photo.
The brass-colored wheel in the bottom center is the balance wheel. It's attached to the thin spring above it called the hairspring. The balance wheel spins until the force of the hairspring pushes it back in the other direction. This is the equivalent of having a pendulum in a standard wall clock. The time to complete one rotation of the wheel or one swing of the pendulum is constant*, so the rate at which the escapement lets the mainspring's energy escape is steady. Et voila, a timekeeping device.

So I thought I was done with tracing the energy through a watch, but take a look at this picture from horologist.com:


What's a crown wheel? or a click spring? or a click, for that matter?

There is more work to be done here.